Using the app
Hyveon ships as a packaged Electron desktop app. It is the control surface for everything the stack does: it runs the Pulumi program that provisions your AWS account, it edits the JSON configuration object that declares your servers, it starts and stops those servers on demand, and it shows their logs and costs.
This section documents every screen. If you have not deployed anything yet, read the setup guide first for the AWS-account prerequisites, then come back here — the app's first-run wizard walks you through the rest.
A guided tour
The path from a fresh install to a running game server is eight steps. Each one links to the page that covers it in full.
1. First launch
The app checks whether you have finished setup. If you have not, it replaces the entire window with the first-run wizard — there is no dashboard, no sidebar, and no way to skip ahead. This is deliberate: nothing else in the app works until Pulumi has a state backend to talk to.
2. Complete the wizard
Five steps: choose your cloud (AWS is the only option today), provision AWS access (let Hyveon create and rotate a deploy principal via a guided CloudFormation flow, or skip straight to your own credentials), point the app at an AWS profile or paste access keys, create the three bootstrap resources (an S3 state bucket, an S3 configuration bucket, and a DynamoDB run-history table), and finally initialize the Pulumi stack against that new backend.
Progress is saved on every step change, so you can close the app and pick up where you left off. See First-run wizard.
3. Deploy the infrastructure
The wizard only creates the backend — the bucket Pulumi stores its state in. Your actual infrastructure (the ECS cluster, EFS file systems, Lambdas, DynamoDB tables, Route 53 wiring) does not exist yet.
Go to Infrastructure, click Run plan, read the change summary, click Approve plan, then Apply. See Infrastructure.
4. Add a game
Open Games and click Add game. A six-step wizard collects the container image, the Fargate CPU/memory pair, the ports it listens on, the EFS volumes it needs, and any environment variables to inject into the container.
Submitting the wizard writes an entry into the JSON configuration object
(deployment-config.json, in your S3 configuration bucket) and nothing
else. Your new game shows up in the games table tagged Pending deploy, and
a banner appears telling you changes are waiting. Go back to Infrastructure
and run another plan/approve/apply cycle to actually create the task
definition, the EFS access point, and the log group in AWS. See Games.
5. Start it
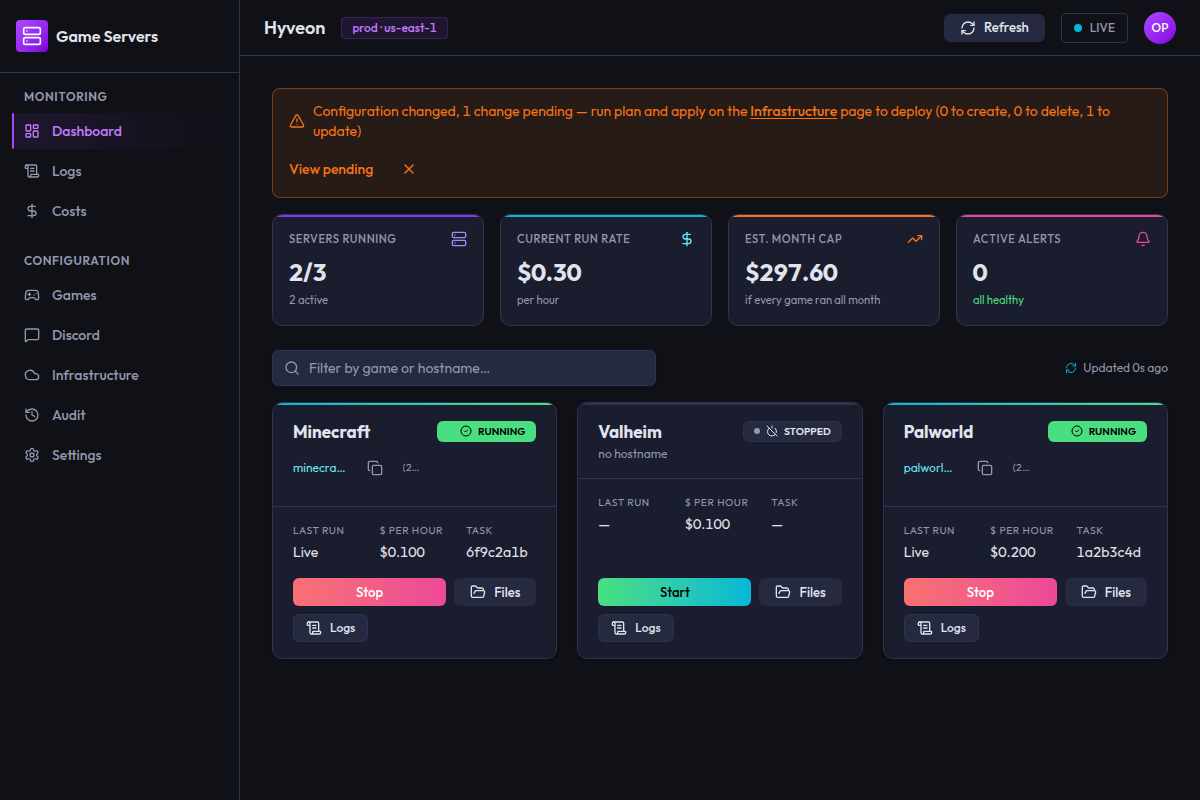
Back on the Dashboard, your game now has a card. Click Start. The app
calls ECS RunTask against the {game}-server task definition — there is no
always-on service, so you only pay while a task is actually running.
The badge moves STOPPED → STARTING → RUNNING, and once the task reaches
RUNNING a Lambda publishes a Route 53 record for it. The card shows the
hostname with a copy button. See Dashboard.
6. Check the logs
If the server does not come up, open Logs, pick the game from the combobox, and watch the CloudWatch tail. Filter by level, search to highlight, and pause when you want to read something without it scrolling away. See Logs.
7. Watch the costs
Costs shows a per-game table of what each server costs per hour, per day and per month, estimated from its declared Fargate CPU and memory — the app makes no AWS Cost Explorer API calls, ever. For real billed spend, a callout links out to the AWS Cost Explorer console. See Costs.
8. Stop it
Click Stop on the card. A confirmation dialog appears (with an option to suppress it for the rest of the session), then a toast with an Undo button in case you hit the wrong card. Stopping the task deletes its DNS record and stops the billing clock.
You can also leave it to the watchdog: after a configurable number of consecutive idle checks, the watchdog Lambda stops the task for you. See Settings.
Navigation map
The sidebar has two groups. Monitoring is where you watch what is happening; Configuration is where you change it.
| Screen | Route | What it is for | Page |
|---|---|---|---|
| Dashboard | / | Start and stop servers, see status at a glance, open a server's save files | Dashboard |
| Logs | /logs, /logs/infrastructure | Nested sidebar group: Game Logs tails one game server, Infra Logs tails one of the app's 5 Lambda functions | Logs |
| Costs | /costs | Per-game Fargate cost estimates, AWS Cost Explorer link-out | Costs |
| Games | /games | Declare, edit and remove game servers in the JSON configuration object | Games |
| Discord | /discord | Bot credentials, guild allowlist, admins, per-game permissions | Discord |
| Infrastructure | /iac | Plan, approve, apply, destroy; run history and rollback | Infrastructure |
| Audit | /audit | Who changed what, with before/after config | Audit |
| Settings | /settings | Watchdog tuning, re-run the cloud setup wizard, app diagnostics | Settings |
Three routes have no sidebar entry and are reached from within another screen:
| Route | Reached from |
|---|---|
/games/:name | Clicking a game name in the games table |
/iac/history | The View history link on the Infrastructure page |
/iac/history/:runId | Clicking a run's kind in the history table |
The one rule worth internalising
Editing a game never changes AWS. Creating, editing and removing games rewrites the JSON configuration object and stops there. Every one of those changes stays inert until you run a plan and apply it from the Infrastructure page.
This is why the app has a pending-changes banner, a Pending deploy chip, and
an approval gate — the write and the deployment are deliberately two separate
acts, so you can batch several edits and review the whole diff once.
The corresponding rule on the other side: starting and stopping a server is not an infrastructure operation. Start/Stop calls ECS directly and takes effect immediately. The Pulumi stack declares what could run; the dashboard decides what is running.
Related reading
- Setup guide — AWS account prerequisites, the IAM policy, DNS.
- Architecture — how the three pieces fit together.
- Infra program reference — every resource the Pulumi program declares.
- User guide — the Discord slash commands, from a player's point of view.
- Management app internals — for people changing the app's code.